Thursday, December 5, 2013

Running UNIX shell commands from vim


To run a single UNIX command use the command:
   :!UNIX_command
You can start a shell from within vi and use it as you would your usual UNIX environment, then exit the shell and return to vi
To start up a shell enter the command:
   :sh
The type of shell that is started is determined by the $SHELL variable. You can specify that some other shell is to be started by setting the vi shell option
Return to using vi by entering the command exit or Ctrl-D


Shell Functions


:! cmdExecutes shell command cmd; you can add these special characters to indicate:% name of current file# name of last file edited
!! cmdExecutes shell command cmd, places output in file starting at current line
:!!Executes last shell command
:r! cmdReads and inserts output from cmd
:f fileRenames current file to file
:w !cmdSends currently edited file to cmd as standard input and execute cmd
:cd dirChanges current working directory to dir
:shStarts a sub-shell (CTRL-d returns to editor)
:so fileReads and executes commands in file (file is a shell script)
!Motion_cmdSends text from current position to Motion Command to shell command cmd
!}sortSorts from current position to end of paragraph and replaces text with sorted text

Displaying vi option values

To display the current value of all options enter the command:
:set all
To display the value of those options whose values have been reset from their default enter the command:

:set


Change an option value temporarily

To change a the value of an option temporarily:
   :set option_name
or:
   :set option_name=value

This sets the value of the option until you quit vi.

Change an option value permanently

To make a lasting change, create a file named .exrc, containing the set commands, in your home directory. The next time you use vi these options will take effect and will remain in force until you edit the .exrcfile to change them.

You can, of course, temporarily change the value of any option.

Examples of setting vi options permanently

1. To set a number of options place the set commands in the file .exrc.
   set ic
   set number
   set sh=/usr/local/bin/Tcsh
   set wm=5
This sets vi to:
   - ignore the case of characters in searches
   - display line numbers
   - use the TC shell to execute UNIX commands
   - wrap text five characters from the right edge
     of the screen
2. Options can also be set using the environment variable EXINIT.
   setenv EXINIT 'set ic number sh=/usr/local/bin/Tcsh wm=5'
For the C and TC shell user, this sets the same options as in the example above.

If there is a .exrc file owned by you in your home directory or the current directory, vi will take its option values from this and not from the EXINIT environment variable.
Friday, November 1, 2013

hosts for facebook


173.252.100.26 facebook.com
173.252.100.26 www.facebook.com
173.252.100.26 www.login.facebook.com
173.252.100.26 login.facebook.com
173.252.100.26 apps.facebook.com
173.252.100.26 register.facebook.com
173.252.100.26 vi-vn.connect.facebook.com
173.252.100.26 vi-vn.facebook.com
173.252.100.26 static.ak.connect.facebook.
173.252.100.26 error.facebook.com
173.252.100.26 register.facebook.com
173.252.100.26 bigzipfiles.facebook.com
173.252.100.26 pixel.facebook.com
173.252.100.26 upload.facebook.com
173.252.100.26 graph.facebook.com
173.252.100.26 developers.facebook.com
173.252.100.26 blog.facebook.com
173.252.100.26 channel.facebook.com
173.252.100.26 connect.facebook.com


Friday, October 25, 2013

winsxs folder


How to move the WinSxS (Windows Side-by-Side) folder in Win 7

Please use winsxslite


Thursday, October 24, 2013

Changing your hosts file in Vista


C:\Windows\System32\drivers\etc
+ hosts

Properties | Security | Edit

# Copyright (c) 1993-2006 Microsoft Corp.
#
# This is a sample HOSTS file used by Microsoft TCP/IP for Windows.
#
# This file contains the mappings of IP addresses to host names. Each
# entry should be kept on an individual line. The IP address should
# be placed in the first column followed by the corresponding host name.
# The IP address and the host name should be separated by at least one
# space.
#
# Additionally, comments (such as these) may be inserted on individual
# lines or following the machine name denoted by a '#' symbol.
# For example:
#
#      102.54.94.97     rhino.acme.com          # source server
#       38.25.63.10     x.acme.com              # x client host
173.252.110.27 facebook.com
69.171.247.29 www.facebook.com
173.252.100.27 login.facebook.com
66.220.152.19 upload.facebook.com
66.220.152.19 graph.facebook.com
173.252.100.27 pixel.facebook.com
173.252.112.23 apps.facebook.com


Tuesday, September 10, 2013

Monday, July 15, 2013

Reset Windows password


Boot with CDROM installer: Repair your computer | Command Prompt |
copy c:\windows\system32\sethc.exe c:\
copy c:\windows\system32\cmd.exe c:\windows\system32\sethc.exe

Reboot Windows with "Shift 5 times"

net user geek MyNewPassword

Reboot with CDROM installer: Command Prompt

copy c:\sethc.exe c:\windows\system32\sethc.exe


Sunday, June 23, 2013

Command-Line editing mode


set -o emacs  (bash initially starts with emacs-mode, or see -noediting option for more details)
or set -o vi

emacs editing mode
+ CTRL - B: backward one character
+ CTRL - F: forward one character
+ DEL: delete one character backward
+ CTRL - D: delete one character forward

+ ESC - B: backward one word
+ ESC - F: forward one word
+ ESC - DEL: delete one word backward
+ ESC - D: delete one word forward

+ CTRL - A: Move tobeginning
+ CTRL - E: Move to end
+ CTRL - K: Kill forward to end

vi editing mode
+ h: move left one character
+ l: move right one character
+ b: move left one word
+ w: move right one word

Wednesday, May 29, 2013

Copy contents to clipboard


Start | Run | shell:sendto


Create new shortcut with "location"

CMD /C CLIP <


Monday, May 13, 2013

Firefox shortcuts:: Tips


TAB::

Ctrl + Tab 

Ctrl + (1-9) 
Ctrl + 9: 

Ctrl + T  
Ctrl + N 

Ctrl + Shift + T 

Ctrl + W 

TAB Groups::

Ctrl + Shift + E 
Address & Search:

Ctrl + L 
Ctrl + K


Tuesday, May 7, 2013

DEK Technologies Headquarters


DEK Technologies Headquarters Melbourne, Australia

DEK Technologies Pty. Ltd.
Cnr Riggall St and Maldon St
Broadmeadows, VIC. 3047
Australia.

Phone: +61 3 9309 1808
Fax: +61 3 9309 1878
Email: info@dektech.com.au


Postal Address
P.O. Box 713
Dallas, 3047
Victoria, Australia

Friday, May 3, 2013

Mail configuration for Outlook 2007


To configure Outlook 2007 for your Gmail address:
  1. Enable POP in your email account. Don't forget to click Save Changes when you're done.
  2. Open Outlook.
  3. Click the Tools menu, and select Account Settings...
  4. On the E-mail tab, click New...
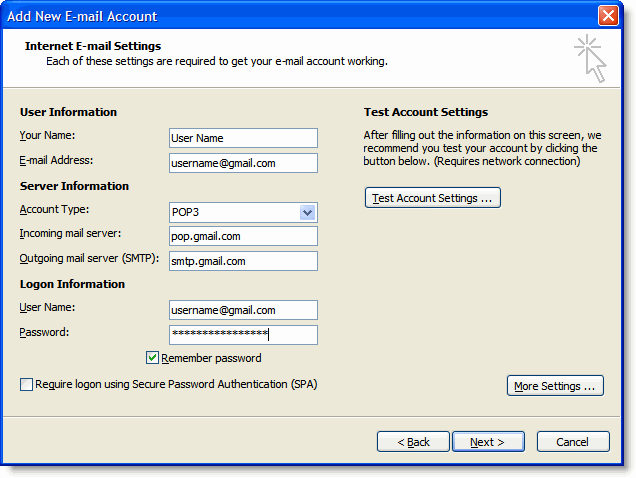
  5. If you are prompted to Choose E-mail Service, select Microsoft ExchangePOP3IMAP, or HTTP, and click Next.
  6. Fill in all necessary fields to include the following information:
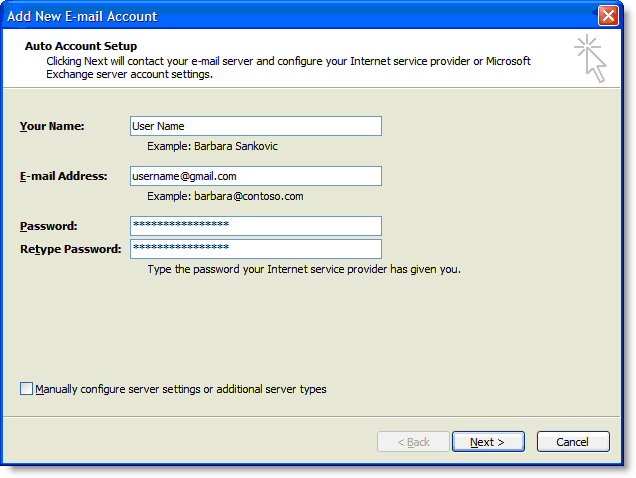
  7. Your Name: Enter your name as you would like it to appear in the From: field of outgoing messages.
    Email Address: Enter your full Gmail email address (username@gmail.com). Google Apps users, enter your full address in the formatusername@your_domain.com.
    Password: Enter your email password.
    Manually configure server settings or additional server types: Leave this option unchecked if you want to automatically configure Outlook 2007. If you want to manually configure Outlook 2007, check this box now. Google Apps users should configure manually as follows.
    Enter name, email address, and password
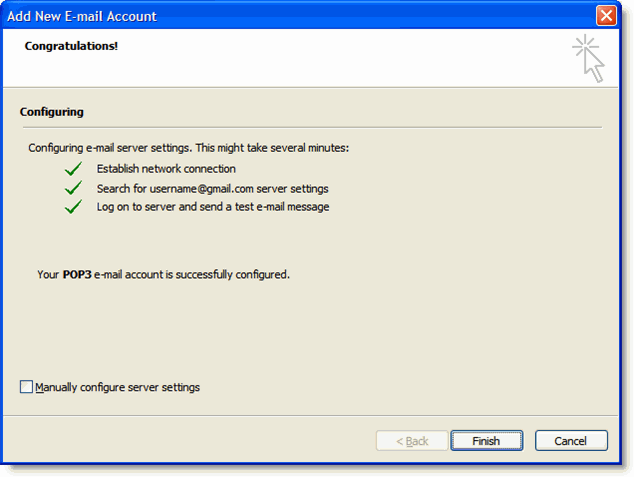
  8. Click Next. If you are configuring Outlook 2007 automatically, you're done! Just click Finish.
  9. Successful Configuration
  10. If you are configuring Outlook 2007 manually, select Internet E-mail and click Next.
  11. Verify your User Information, and enter the following additional information:
  12. Server Information
    Account Type: POP3
    Incoming mail server: pop.gmail.com (Google Apps users, enter the server names provided, don't add your domain name in these steps)
    Outgoing mail server (SMTP): smtp.gmail.com
    Logon Information
    User Name: Enter your Gmail username (including @gmail.com). Google Apps users, enter your full address in the format username@your_domain.com
    Password: Enter your email password.
    Require logon using Secure Password Authentication (SPA): Leave this option unchecked.
    Account Settings
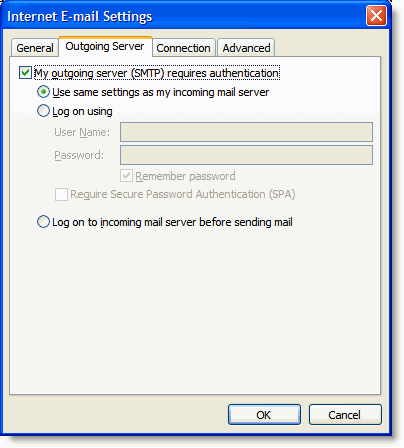
  13. Click the More Settings... button, and select the Outgoing Server tab.
  14. Check the box next to My outgoing server (SMTP) requires authentication and select Use same settings as my incoming mail server.
  15. Outgoing Server Tab
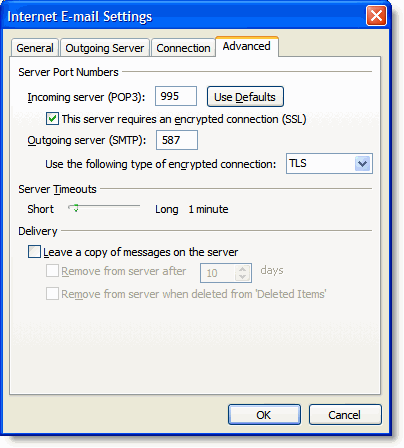
  16. Click the Advanced tab, and check the box next to This server requires an encrypted connection (SSL) under Incoming Server (POP3).
  17. In the Outgoing server (SMTP) box, enter 587, and select TLS from the drop-down menu next to Use the following type of encrypted connection:.
  18. Advanced Tab
  19. Click OK.
  20. Click Test Account Settings... After receiving 'Congratulations! All tests completed successfully', click Close.
  21. Click Next, and then click Finish.
Congratulations! You're done configuring your client to send and retrieve Gmail messages.

Thursday, May 2, 2013

regsvr32.exe


In computingregsvr32 (Microsoft Register Server) is a command-line utility in Microsoft Windows operating systems for registering and unregistering DLLs and ActiveX controls in the Windows Registry.
To be used with regsvr32, a DLL must export the functions DllRegisterServer and DllUnregisterServer.


regsvr32 shmedia.dll for registering a file
regsvr32 /u shmedia.dll for unregistering a file
If another copy of shmedia.dll exists in the system search path, regsvr32 may choose that copy instead of the one in the current directory. This problem can usually be solved by specifying a full path (e.g., c:\windows\system32\shmedia.dll) or using the following syntax:
regsvr32 .\shmedia.dll


Thursday, April 18, 2013

"Send To" menu context in Windows


Windows | Run | shell:sendto

HKEY_CURRENT_USER \ Software \ Microsoft \ Windows \ CurrentVersion \ Policies \ Explore

  • Create a new DWORD (32-bit) value named NoDrivesInSendToMenu
  • Double-click NoDrivesInSendToMenu and set its value data to 1

HKEY_CLASSES_ROOT\AllFilesystemObjects\shellex\ContextMenuHandlers\Send To. 
  ---> Just delete the ones you don't use.


Friday, April 12, 2013

28022013


28022013 Project: See https://28022013.codeplex.com/


Project Description
- Collect tips and tricks C/C++ programming languages
- Shell scripts i.e: Bash, C shell
- Testing Codeplex purpose only


git config --global user.name "altonjuve"
git config --global user.email "viet2105@outlook.com"
------ just for backup::: git clone https://git01.codeplex.com/28022013 CodePlex

git add cbf.bash
git commit -m "cbf.bash"
git add create_dir_for_iandv.sh
git commit -m "add create_dir_for_iandv.sh"

git add ffp.sh
git commit -m "add ffp.sh"

git add get_bin.sh
git commit -m "add get_bin.sh"


git add get_node_ipaddr.sh
git commit -m "add get_node_ipaddr.sh"

git add repac.sh
git commit -m "add repac.sh"

git add ccode.sh

git commit -m "my first commit to CodePlex"
git push origin master

Labels